

How To Tint Layers In Photoshop
With a photo that's just a little as well bright, Photoshop is hither to save the day by offering several unproblematic epitome darkening tools. Whether yous need to darken your entire photograph, a unmarried layer, or only target a specific area, Photoshop makes information technology easy. With the tips outlined below, y'all'll be able to correct your brilliant photos in no fourth dimension.
To darken an image in Photoshop, go to Image > Adjustments > Exposure to create a new Exposure Adjustment Layer. In the dialogue box that appears, move the "Exposure" slider to the left to darken your photo. This will darken your entire paradigm at one time and correct any overexposed areas.
Depending on the verbal darkening adjustment yous want to perform, there are a few unlike ways to practise information technology. Permit's get into the specifics and become you up to speed on the best ways to darken images in Photoshop.
three Like shooting fish in a barrel Tools For Darkening Images In Photoshop
There are a ton of dissimilar ways to brand these adjustments in Photoshop. To avoid overwhelm, let's focus on the three most important ones. The three adjustment methods below are the fastest and easiest to utilize, no matter your ability levels.
i. The Exposure Aligning Layer
The exposure adjustment layer allows you to control your image's overall exposure (aka brightness) with a unmarried slider. For images with blown-out highlights, this is a smashing tool to use.
There are a couple of different ways y'all can create an Exposure Adjustment Layer depending on your preferences. The first way is by going to your Adjustments Panel and selecting the Exposure Adjustment icon.
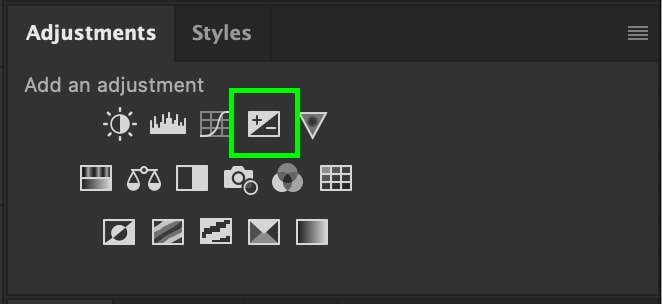

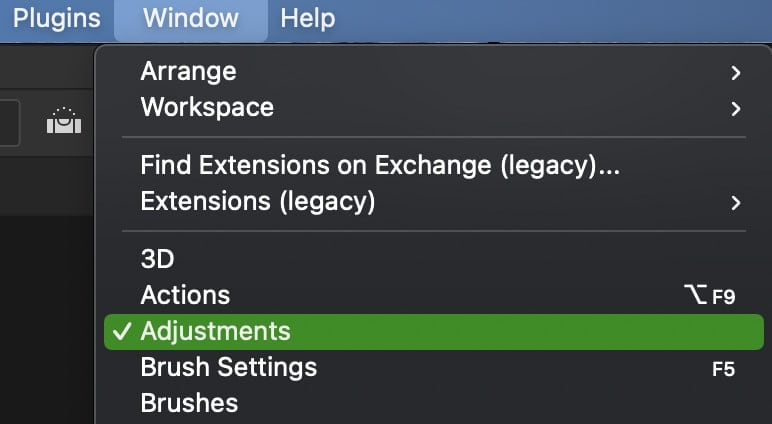
If you don't see this panel, become upwardly to Window > Adjustments.
You tin achieve a like consequence by going to Image > Adjustments > Exposure to create a new exposure adjustment.

The deviation with this way is that you will non have an Exposure Adjustment Layer created afterward. Instead, the concealment adjustment will employ direct to your image, making it uneditable.
Since it's always dainty to piece of work non-destructively and have the option to refine adjustments, the adjustment panel method is more favorable.
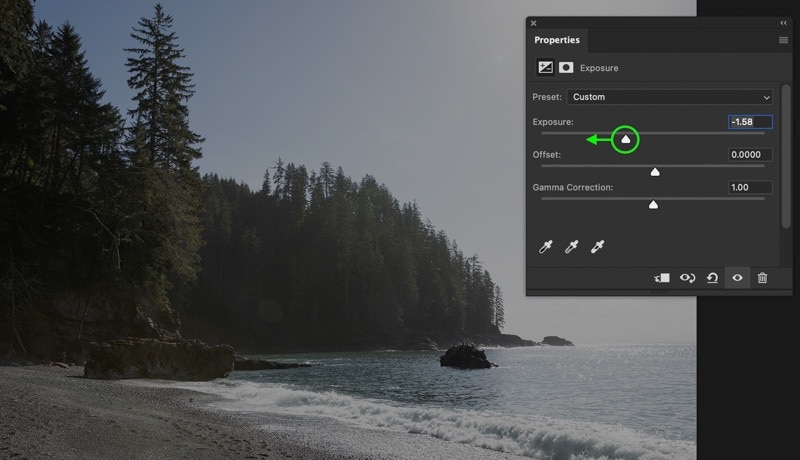
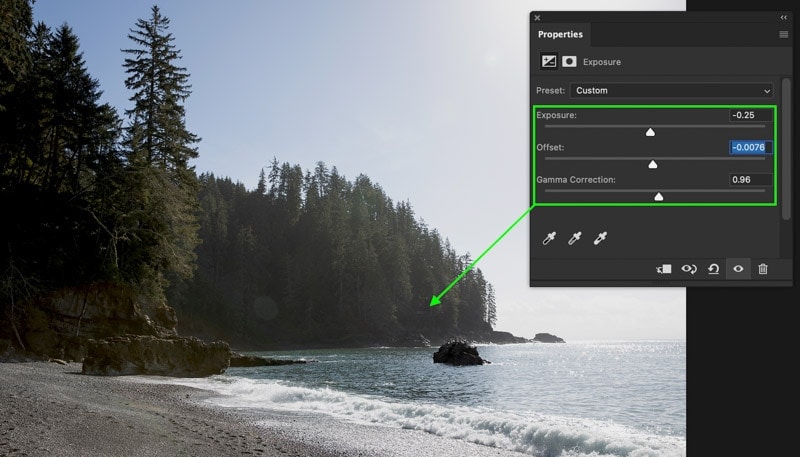
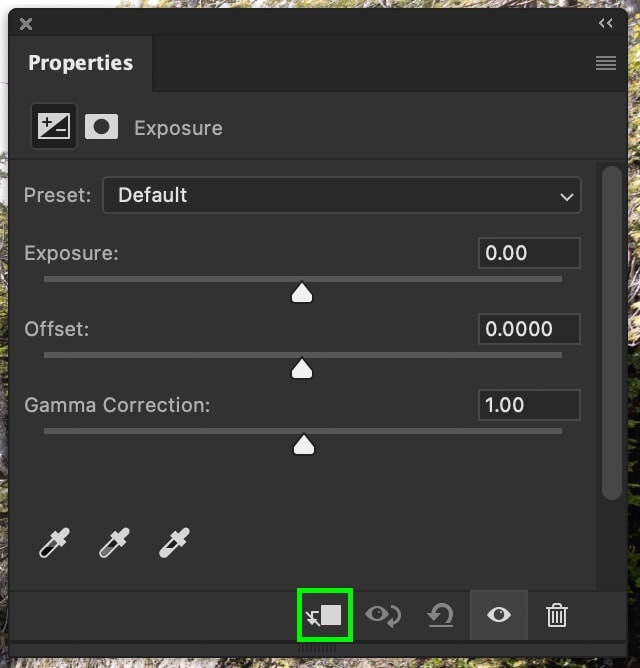
Regardless of which method y'all used, a dialogue box will appear with iii different sliders called:
- Exposure
- Showtime
- Gamma Correction

The Exposure slider will command the overall brightness or darkness of your photograph. Since we're talking about darkening images in Photoshop, that ways you'll move the Exposure Slider left.
As you motion this slider further left, your image will go increasingly dark. Depending on how brilliant your photograph was to brainstorm with, the right setting volition vary.
After the exposure adjustment, you're left with the Offset and Gamma Correction sliders. The Offset slider volition elevator or lower the base point of your shadows. Past increasing this slider, your paradigm will have on a matte advent while taking on deeper shadows when decreased.
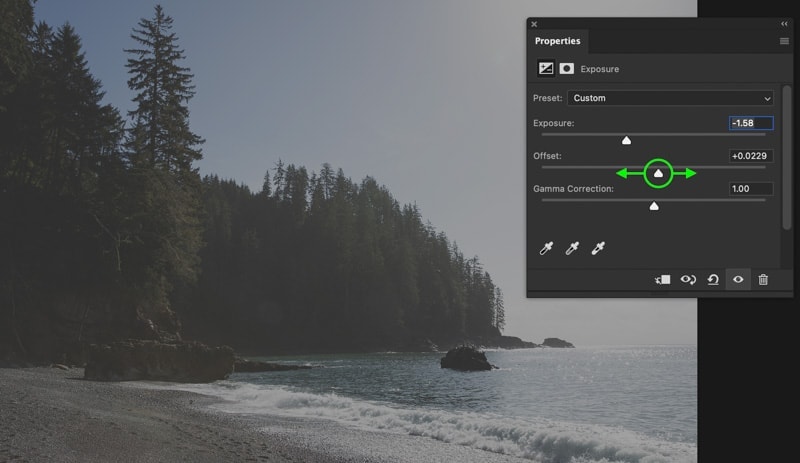
Meanwhile, the Gamma Correction slider offers further control to the brightness of the mid-tones. By adjusting this slider, you can burnish or darken the middle exposure values to further refine your darkening adjustment.

The Offset and Gamma Correction sliders are more helpful additions rather than necessary tools. If you only want to make a quick darkening adjustment to your photo, decreasing the Exposure Slider volition do the trick. The other sliders just offer an piece of cake way to ameliorate your exposure further if needed.
2. Camera RAW
For those who already feel comfortable in Lightroom, darkening images in Camera RAW volition feel right at home. Camera RAW is a tool inside Photoshop that allows yous to process RAW files earlier bringing them into the master workspace. When opening a RAW file directly from your computer, Camera RAW will open automatically, making information technology unproblematic to access.
Fifty-fifty if you aren't working with a RAW file or have already opened your photograph in Photoshop, Camera RAW is like shooting fish in a barrel to access.
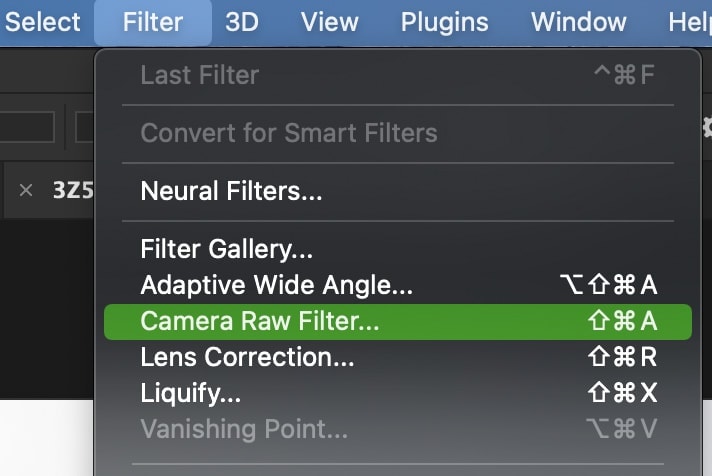
With your epitome layer selected, become to Filter > Photographic camera RAW Filter to open Photographic camera RAW.
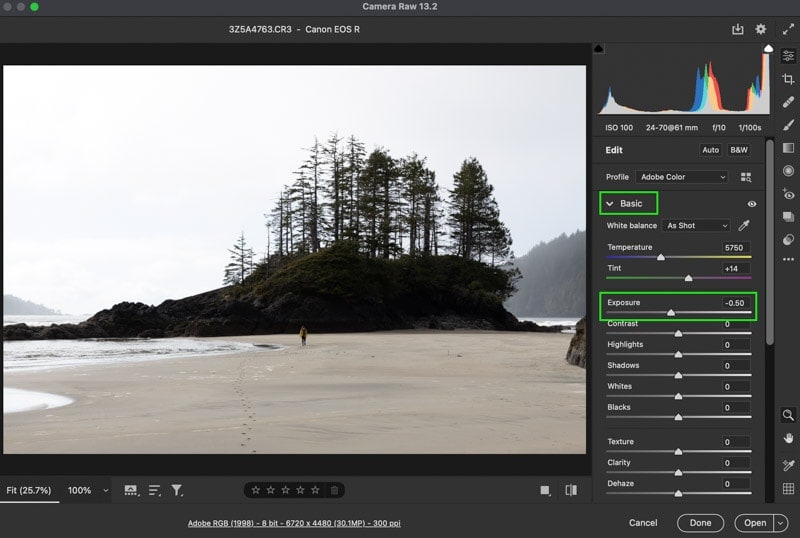
Once inside, make sure you're in the Basic Panel and wait for the Exposure Slider. By dragging this to the left, y'all can darken your unabridged photo at once.
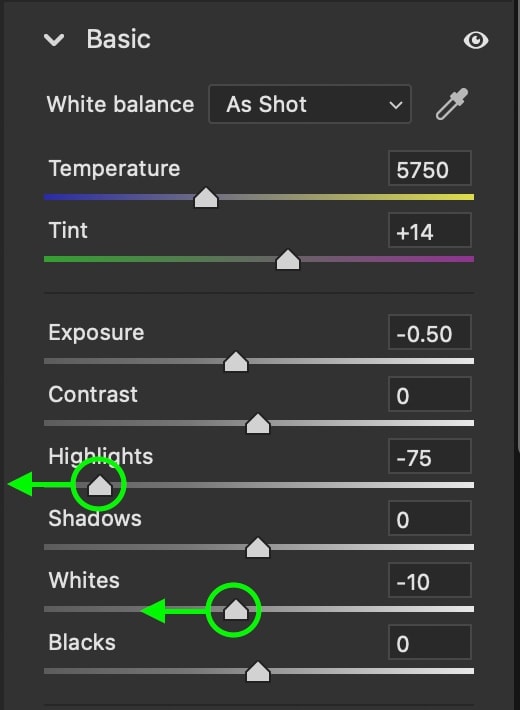
In many cases, you lot may simply want to darken the brighter parts of your photo. Things like an over-exposed heaven or the highlight on someone's confront. In this situation, the whites and highlights sliders testify useful equally well.
Using either one, yous'll only darken the brightest parts of your photo, leaving the shadows untouched. This is a peachy way to refine your concealment adjustments without crushing the shadows.
Once you're happy with the adjustment, press OK or Open up to go out Camera RAW.
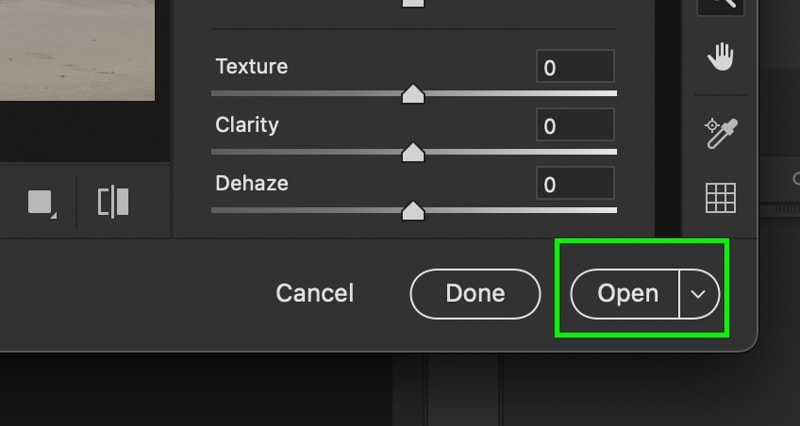
By default, Camera Raw will utilize all your adjustments directly onto your layer. That means you cannot go back to refine your adjustments later on on. Luckily, there is a workaround to this with the assist of smart objects!

If you want the option to edit your Camera RAW Filter after on, start convert your layer to a smart object past right-clicking > Convert To Smart Object.
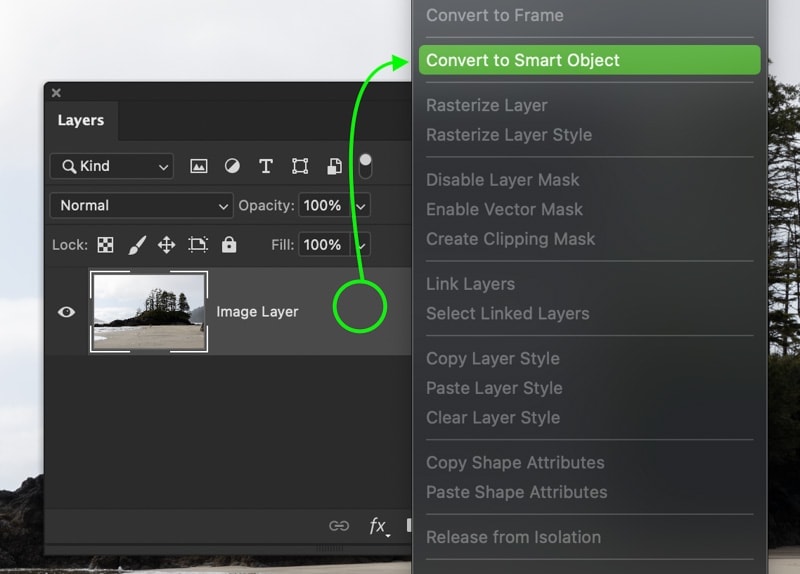

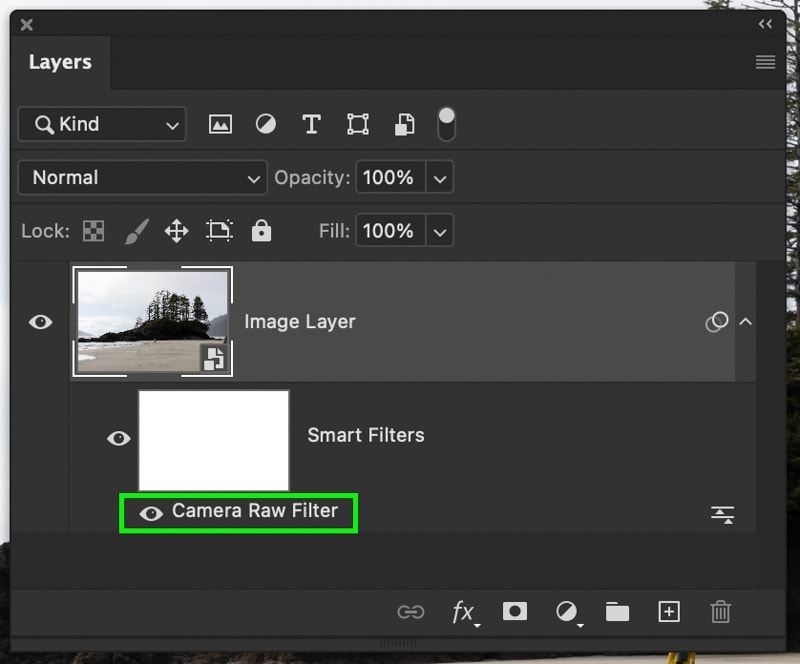
From there, you can follow the same steps equally earlier (Filter > Photographic camera RAW Filter) and brand your adjustments. This time, once you've exited Camera RAW, it will be accessible below your layer.
If yous want to become back to your adjustments, only double-click on the filter to gain access.
Yous can larn more about smart objects and why they're useful here.
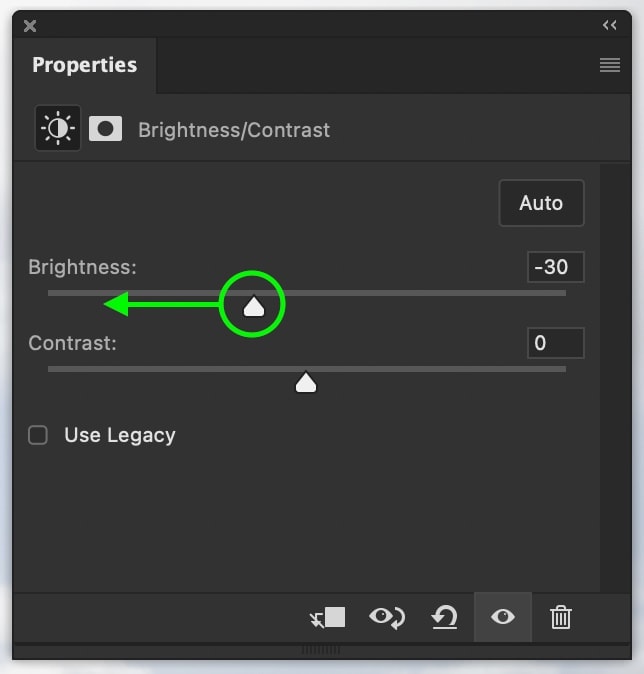
3. The Brightness & Dissimilarity Adjustment Layer
Now for the third fashion to darken an image in Photoshop comes the Brightness & Contrast Aligning Layer. This is the nigh simple to use darkening adjustment as it just has two sliders to piece of work with. If you want to darken a photograph in Photoshop speedily, this adjustment layer offers some other slap-up option.
First, create a new Brightness & Contrast Aligning layer by clicking on the icon in the Adjustments panel. This will create a new aligning layer in your layers console, assuasive you to edit non-destructively.

Alternatively, y'all tin can go up to Image > Adjustments > Brightness/Contrast. With this method, the adjustment will be directly applied to your image or layer. So but do this if yous know you'll be sure with the adjustments you make!

Regardless of how you create the aligning layer, a dialogue box volition appear, offer yous ii dissimilar sliders: Brightness and Contrast.
The brightness slider volition control the overall exposure of your photo.
The contrast slider controls the intensity of your highlights and shadows.
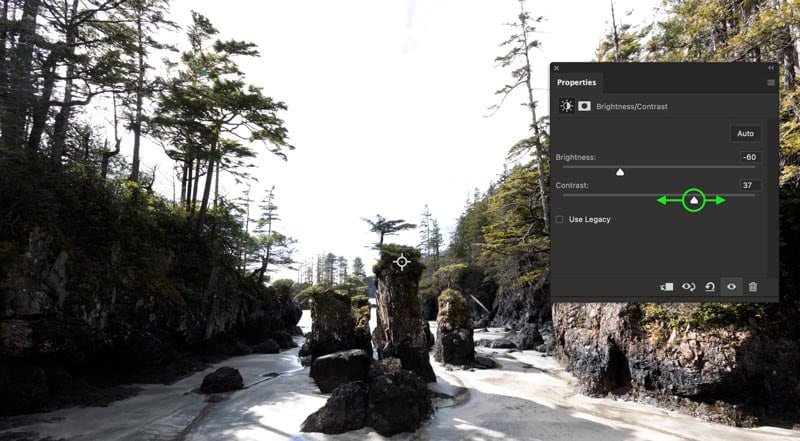
To darken your photograph, movement the brightness slider to the left. Once your photo is darkened, y'all can play around with the contrast slider to heighten the concealment adjustment. For a more moody await, effort increasing the contrast!
How To Darken A Layer In Photoshop
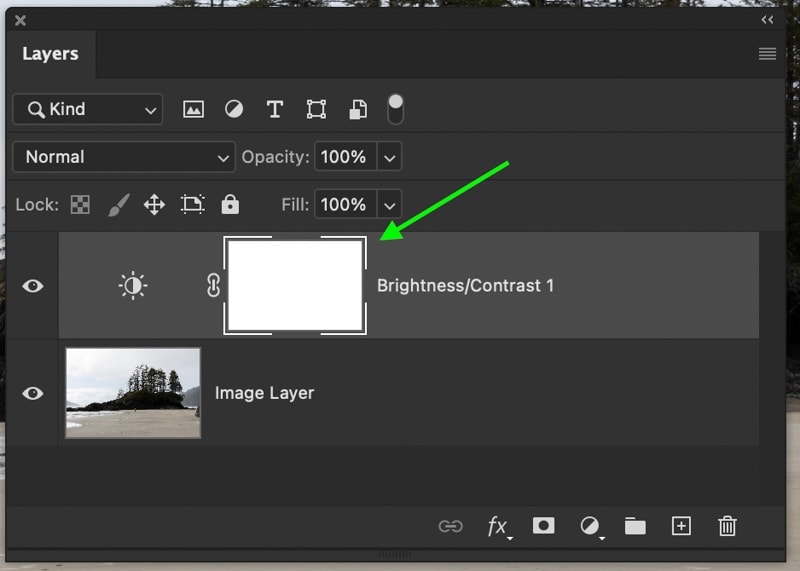
To darken a layer in Photoshop, create a new Brightness & Contrast Adjustment Layer above the layer you want to darken. In the dialogue box that appears, drag the Effulgence slider leftwards, and so printing Command/Command + Option/Alt + Grand to create a new clipping mask. Now your darkening adjustments will just be visible on the layer straight below the Effulgence & Dissimilarity Adjustment Layer.
In Photoshop, all adjustment layers will utilize to the entire canvas past default. That means a darkening adjustment would be applied to all layers below the concealment adjustment in the layers panel.
To brand your adjustment only target a sure layer, you'll need to employ something called a clipping mask.
Of the three concealment tools you learned almost previously, only the exposure adjustment and the brightness & dissimilarity adjustment will work with a clipping mask. That's because clipping masks only work with aligning layers.
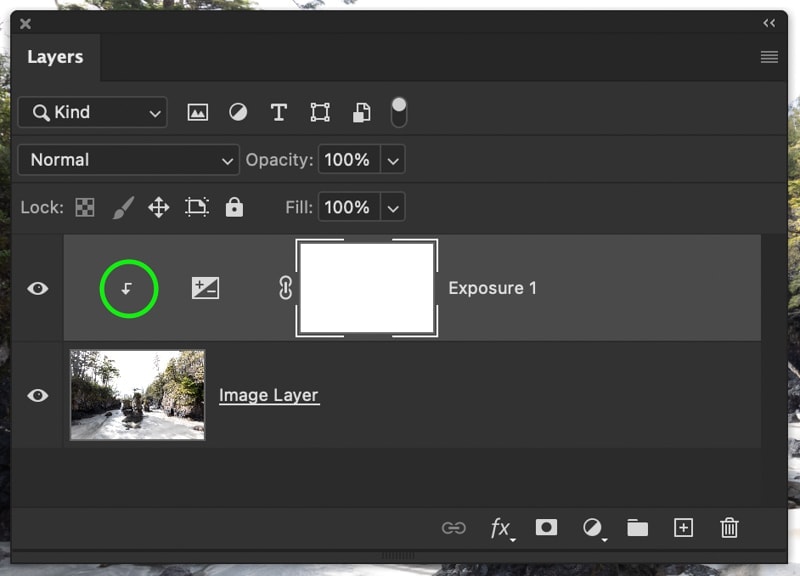
In this example, let's darken this layer with an exposure adjustment. I'll start by clicking on the exposure adjustment icon in the Adjustments console.
If you don't run across this panel, go to Window > Adjustments.
Then make certain the exposure adjustment layer is above the layer you want to target.

Once the exposure dialogue box appears, click on the clipping mask icon to create a new clipping mask.
Alternatively, you tin can press Command + Pick + G (Mac) or Control + Alt + G (PC) to create a clipping mask.
Now the exposure adjustment will have a right-angle pointer icon indicating a clipping mask. When yous make changes to the exposure aligning layer, the effects will simply be applied to the layer information technology's clipped to.
Clipping masks tin can be used with whatever adjustment layer in Photoshop and are perfect for adding darkening adjustments to i layer. To get a amend thought of all the ways you can use clipping masks in Photoshop, check out this post!
How To Darken Role Of An Image
To darken function of an prototype in Photoshop, offset, create an Exposure Adjustment Layer and place it at the top of the Layers Panel. Next, access the Brush Tool (B) and set up black to your foreground color. With the Exposure Adjustment layer mask selected, pigment over your prototype to hide the darkening adjustments as needed. Now you're left with darkening adjustments only visible in parts of your photo.
Layer masks allow you lot to make your adjustments only show up in certain areas. With the assistance of the Brush Tool, you lot can pigment over your image to tell Photoshop exactly what yous want to edit. For something similar darkening part of an paradigm, layer masks are the perfect tool for the chore.
Once again, the easiest way to do this is by using adjustment layers. Although y'all can create masks in Camera RAW, it'due south a more circular-nigh manner of doing things. That's why I propose using the Exposure or Effulgence & Dissimilarity adjustment layers instead.
For case, allow's create a new Brightness & Contrast adjustment layer.
By default, it will appear in your layers panel with a white box beside the layer icon. This is your layer mask!
Every adjustment layer you create in Photoshop will automatically take a layer mask created for the layer.
How user-friendly is that?
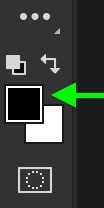
When the layer mask is white (100% visible), that means every office of your image volition exist afflicted by your adjustment layer. To make certain areas transparent, you need to pigment black onto the mask.
To do this, select your Brush Tool (B) and set up your foreground color to black.
Start, make sure your layer mask is selected by the white outline. Then begin to pigment over the areas of your photo you don't want to be darkened.
Once you're finished, the darkening adjustments volition only be visible in the white areas of your mask.

Since I wanted to darken the sky, you lot tin can see that the white area of my mask matches upwardly with the upper section of my image.
Now you've successfully darkened function of your photo with the assist of a layer mask! Layer masks are ane of the nearly valuable tools in Photoshop and tin can be used in countless unlike ways. If y'all're not familiar with them yet, I highly advise checking out this post on the uses of masks!
How To Darken Part Of A Layer
Specially when you're working with cutouts and merging multiple images, you may want to darken part of a sure layer. Rather than using your castor tool and a layer mask to perfectly mask around the edge of something, you can employ a clipping mask to help with the process.
For this instance, I have a cutout of a person that I want to darken a portion of. Commencement, I'll create a Brightness & Dissimilarity adjustment layer.

With the aligning layer created, I'll create a clipping mask to target the cutout layer.

At present I'll utilize my darkening aligning as needed. Bringing down the Brightness slider and and then adjusting the Contrast as necessary.

Considering of the clipping mask, all of these darkening adjustments are only affecting the cutout layer. To further refine this expanse, you can use a layer mask.
With the Brightness & Dissimilarity adjustment layer mask selected, I'll grab the Brush Tool (B) and set up the foreground color to black.
Now painting over the cutout, I can mask out whatever sections that I don't want to darken. Using a clipping mask and layer mask together, you lot get the ultimate command for your darkening adjustments in Photoshop!

How To Darken Text In Photoshop
To darken text in Photoshop, select your text layer and then open the Character Panel. If yous don't see this panel, go to Window > Grapheme. Within the Graphic symbol Panel, click on the "Colour" box. In the color picker that appears, select a darker version of your electric current text colour and click OK. Now the darker color will be applied to your text.
With that said, whether you take an editable text layer or have text baked into your photo, there are a couple of different ways to darken it.
– Darkening A Text Layer
If y'all're working with a text layer, the easiest way to darken information technology is by merely changing the colour. This is apace done with the help of the Character Panel.

Showtime, brand sure your text layer is selected in the layers panel, and so open the Character panel.

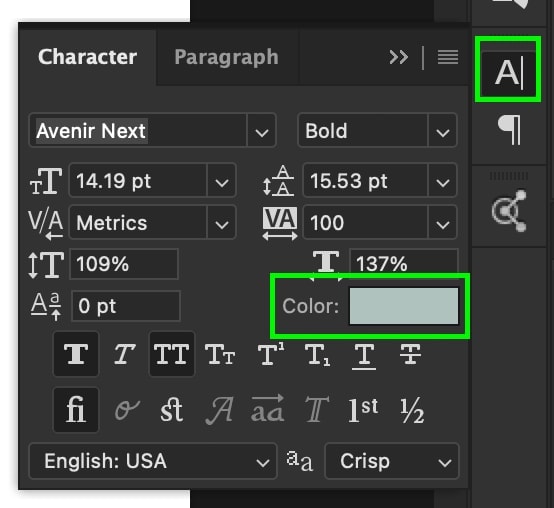
If y'all don't run across this, get up to Window > Grapheme.

Inside the Grapheme console, click on the "Colour" box. From the color picker that appears, select a darker colour than your initial text. Since I had a light turquoise color before, I'll move the color picker to a darker tone and click OK.

Your newly selected color will be applied to your text, and you're left with a darker color than earlier!

– Concealment Text That's Baked Into Your Photograph
In some cases, you may take text that is directly applied to your photo. That means there isn't any editable text layer to piece of work with. Instead, you'll demand to employ a Hue Saturation Adjustment Layer to darken the luminance of your text color.

Starting time, create a new Hue Saturation adjustment layer by clicking on the icon in the Adjustments panel.

In this example, the text we are working with is cyan, which ways nosotros'll need to target the cyan color range. In the Hue Saturation dialogue box, I'll set the color channel from Principal to Dejection.
If y'all have a dissimilar text colour, select the related color aqueduct for your adjustment.
Now click on the Lightness slider and drag it to the left. This will darken the cyan tones in the epitome, in plow, concealment the text.

Past targeting the specific colour range, you lot're able to darken the color of your text without whatever selections. This method offers a very elementary way of doing things when y'all don't have a text layer to work with.
How To Darken Sunlight In Photoshop
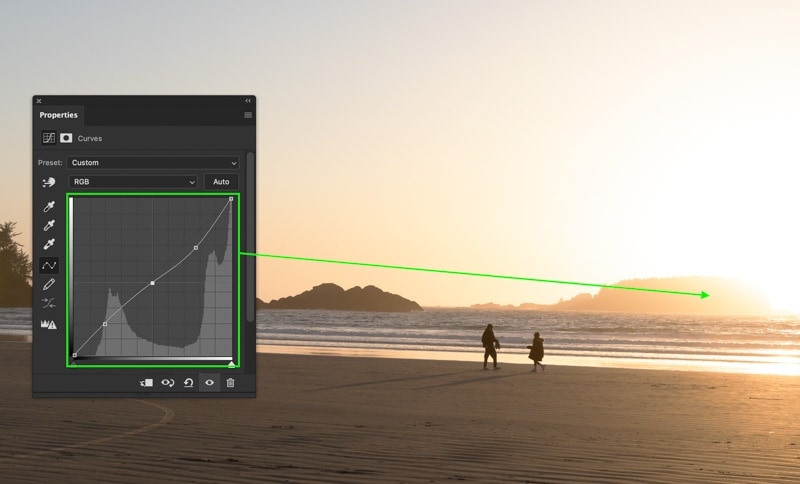
To darken sunlight in Photoshop, create a new Curves Aligning Layer then add ballast points to the shadows and mid-tone areas of the bend. With the anchor points set up, add a third ballast betoken in the highlights and drag it downwardly to darken. This will but darken the highlights in your epitome and, in turn, darken the sunlight in your photo.
To start, create a new Curves Adjustment layer in a higher place your prototype layer.

In the dialogue box that appears, begin past creating two anchor points in the shadows and mid-tones sections. The goal here is to add the anchor points without moving the curve in any way. This way, you tin isolate the highlight exposure range without affecting the rest of your photo.

Once consummate, add another ballast point in the highlights section. This fourth dimension click and drag this ballast point downwardly to darken the highlights. This will darken the brighter areas of your photograph and works well to darken sunlight in Photoshop.

In some cases, y'all may demand to bring down the mid-tones anchor point slightly as well.
After some quick adjustments, you've successfully darkened the sunlight in your photo with the assistance of the Curves Adjustment! You can mix this adjustment with any of the 3 darkening adjustments mentioned previously for even more refined furnishings.
How To Prepare Overexposed Photos In Photoshop
To set overexposed photos in Photoshop, select your image layer, then become to Filter > Camera RAW Filter. Inside Photographic camera RAW, bring down the Exposure Slider to balance out the brightness. Next subtract the Highlights and Whites Sliders to bring back details and set any overexposed areas. Once complete, click OK to save your changes and exit Camera RAW.
If y'all have a totally overexposed photograph, and none of the methods and then far accept washed the fob, Camera RAW offers a refined way of fixing this. Using the highlights, shadows, whites, and blacks sliders, yous can speedily fix a brilliant photograph.
Get-go by selecting your image layer, right-clicking on information technology, and selecting Convert To Smart Object.

So go upwardly to Filter > Photographic camera Raw Filter.
Inside the Basic panel, yous'll find all your fundamental exposure adjustments. Although you lot could eyeball your exposure until it feels less vivid, the histogram will offer exact feedback. So before making whatsoever adjustments, click on the Highlight Clipping Warning option in the histogram.
With this option enabled, whatsoever areas of your photograph that are too brilliant volition show a cherry-red highlight. The goal now is to arrange your sliders until all the red highlight has disappeared.

The easiest fashion to begin is by darkening the Exposure slider to darken the whole photograph. Bring this downwards to where the photo is darker, but zero in the photo has go too dark and difficult to see.
At present bring down the Highlights and Whites sliders to bring back the information in the brighter areas of your photo. Every photograph volition require something unlike, so play effectually with these sliders to run across your options.

Finally, accommodate the Shadows and Blacks sliders to suit your style. Past increasing these sliders, you'll brighten the nighttime parts of your photograph and create a more matte appearance. Past decreasing them, you'll add together contrast to your image and deepen the shadows.

Once yous're happy with the adjustments, click OK to relieve your changes.

Photographic camera RAW volition close and exist saved as a smart filter beneath your layer. Information technology tin can be reaccessed at whatsoever time by double-clicking on the words "Camera RAW" beneath your layer.

Now yous've successfully fixed an overexposed image in Photoshop, score!
How To Darken A Face In Photoshop
To darken a face in Photoshop, create a new Brightness & Contrast Adjustment layer and move the Brightness slider leftward. Clicking on the adjustment layer mask, press Command/Command + I to invert the mask. Now select the Castor Tool (B), ready white to the foreground color, and pigment over the areas of the face up you wish to darken.
To darken someone's face (or sections of it), the Brightness & Contrast Aligning layer with a layer mask is the best tool for the job.
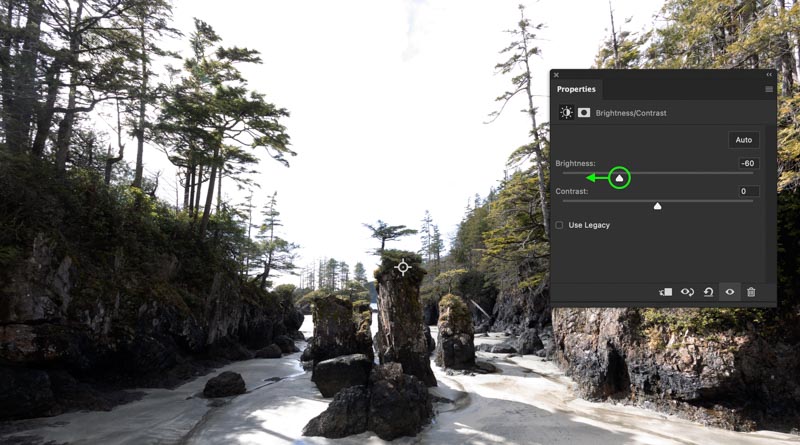
Start by creating a new Effulgence & Contrast Aligning layer by selecting information technology from the Adjustments Panel.
In the dialogue box that appears, conform the brightness slider until you've reached a concealment value you're happy with. At this bespeak, it volition apply to the whole photo, but don't worry, you'll fix this soon. For at present, settle on a darkening value that works for your bailiwick'southward face.

Once happy with the aligning, click on the layer mask and press Command + I (Mac) or Control + I (PC) to invert the layer mask. This will turn your white (aka visible) mask into blackness (100% transparent).

With the darkening aligning completely invisible, it'due south time to add it back with the Brush Tool. Printing B to admission your Brush Tool, and then set white to the foreground color.

Ensure that the Brightness & Contrast layer mask is selected and brainstorm to paint over the areas of your subject's confront you want to darken. Keep this step until you've darkened the desired areas of their face.

If you lot realize that your darkening adjustments aren't quite right, but double-click on the Effulgence & Contrast layer icon to reopen the dialogue box. Now you can conform the Brightness slider equally needed to refine the darkening adjustments. Since your mask has already been created, your new adjustments will only occur in those visible areas!
Now you lot're a main at darkening images in Photoshop with a wide array of helpful techniques to make the job easy. Using the Exposure Aligning, Camera RAW, or the Effulgence & Dissimilarity Adjustment, concealment photos has never been easier.
Happy Editing!
– Brendan 🙂
Source: https://www.bwillcreative.com/how-to-darken-images-and-layers-in-photoshop/
Posted by: carsondins1991.blogspot.com
0 Response to "How To Tint Layers In Photoshop"
Post a Comment